How to install Plantex® Pro
Article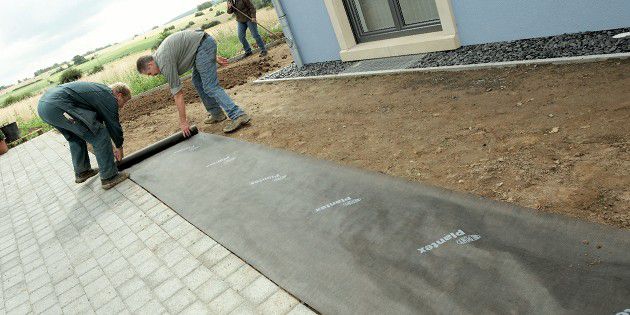
Step 1: Prepare the soil and rake if necessary
Ensure all weeds are thoroughly removed from the installation area before laying Plantex® Pro weed control barrier
Step 2: Roll out Plantex® Pro
For large areas, overlap Plantex® Pro at least 10 cm to prevent weed growth along the edges. Use Plantex® Anchor Pins or Bio Pins to secure the joins. Apply at least 2 pins per running meter. On large unplanted areas weigh down Plantex® Pro with stones or with the new plants to ensure that no movement occurs whilst planting through.

Step 3: Cut an “X” shape in Plantex® Pro
Using sharp scissors or a knife, make the cut either over an existing plant or at the position where the new plant is to go. Work Plantex® Pro gently over existing plants or plant through with new ones.
Step 4: Covering
Cover Plantex® Pro with at least a 5 cm layer of mulch e.g. bark, straw, gravel, decorative chippings etc. The top cover should be thick enough to fully cover the fabric, preventing sun light from reaching the fabric. On the other side it should not be too thick neither so that the mulch may dry out during sunny days. This will slow down the decomposition of mulch.
N.B. Plantex® Pro must be covered. Plantex® Pro acts as a soil separator preventing the covering from mixing in with the soil. This means that less covering is needed with Plantex® than with just a mulch. Plantex® Pro is strong, very light and versatile, but an insufficient mulch covering may lead to very aggressive weeds growing through.
Our warranty is not valid if passage of or contact with machines and/or equipment has taken place, for which our products are not suitable and which have resulted in a possible degradation of our products.